Table of contents
Xelsis Deluxe User Manual
Machine overview
Control panel
Introduction
Special functions
Brewing drinks
Adjusting machine settings
AquaClean water filter
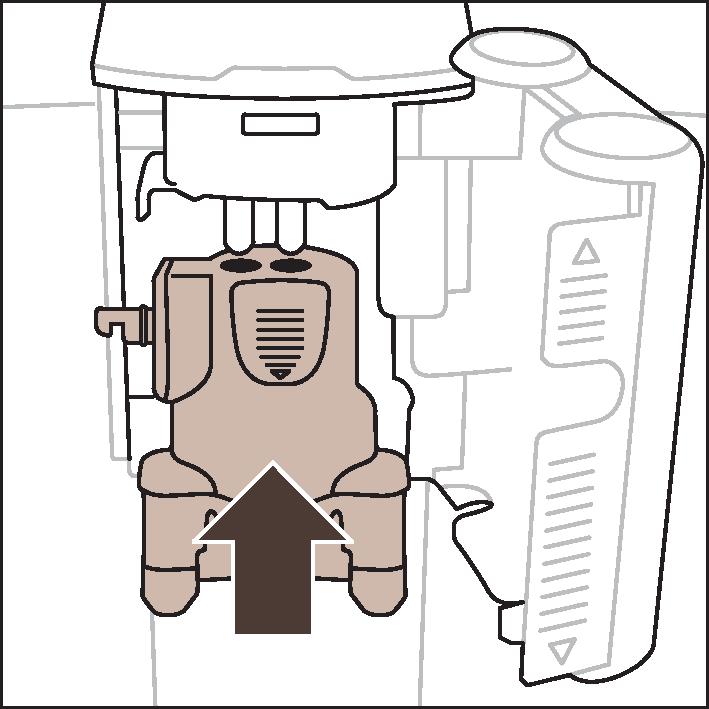
Removing and inserting the brew group
Cleaning and maintenance
Descaling procedure
Error codes
Ordering accessories
Software updates
Troubleshooting
Technical specifications
Declaration of Conformity
Wi-Fi
Xelsis DeluxeUser Manual
Brewing drinks
General steps
To brew a drink, you need to follow a few simple steps.


1 Fill the water tank with tap water and fill the bean hopper with beans.
2 Place one or two cups under the height-adjustable dispensing spout. Slide the dispensing spout up or down to adjust the height to the size of the cup or glass you are using.
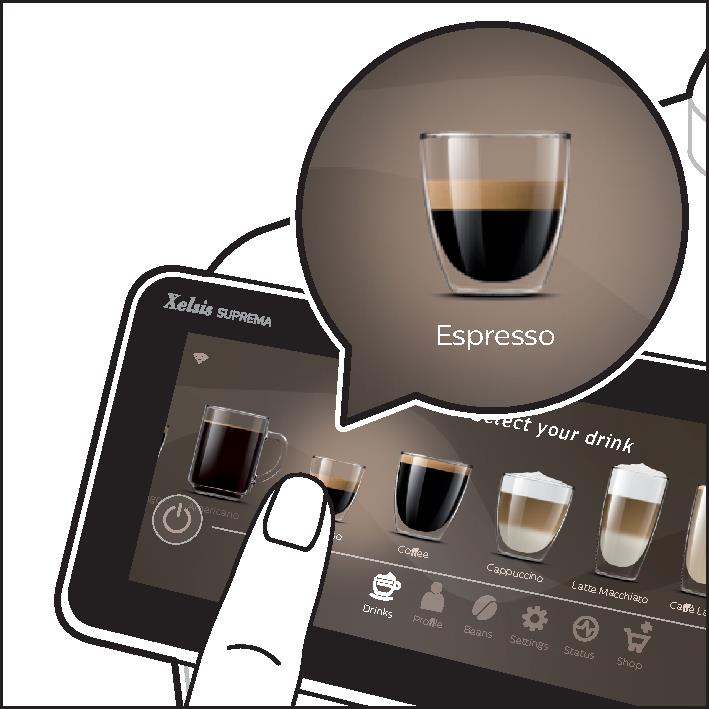
3 Tap the Drinks
icon to enter the 'Drinks' menu. Swipe from left to right to select your drink by tapping on it.


- Tap the '2x' icon if you want to brew two cups. The machine automatically carries out two grinding cycles in sequence of the selected drinks.
The '2x' icon is not available for all drinks.
4 After selecting a drink, you can adjust the settings to your preference by swiping the adjustable bars up and down.
5 Press the start/stop
icon to start brewing the selected drink.

Do not use caramelized or flavored coffee beans.
Turn the grind setting knob in small steps and after brewing 5 cups of coffee you start to taste the difference.
Support on drink parameters
To get additional information about a specific drink parameter, press and hold an adjustable bar for 3 seconds.

Brewing milk-based drinks
| To brew milk-based drinks, you need to follow a few simple steps. |

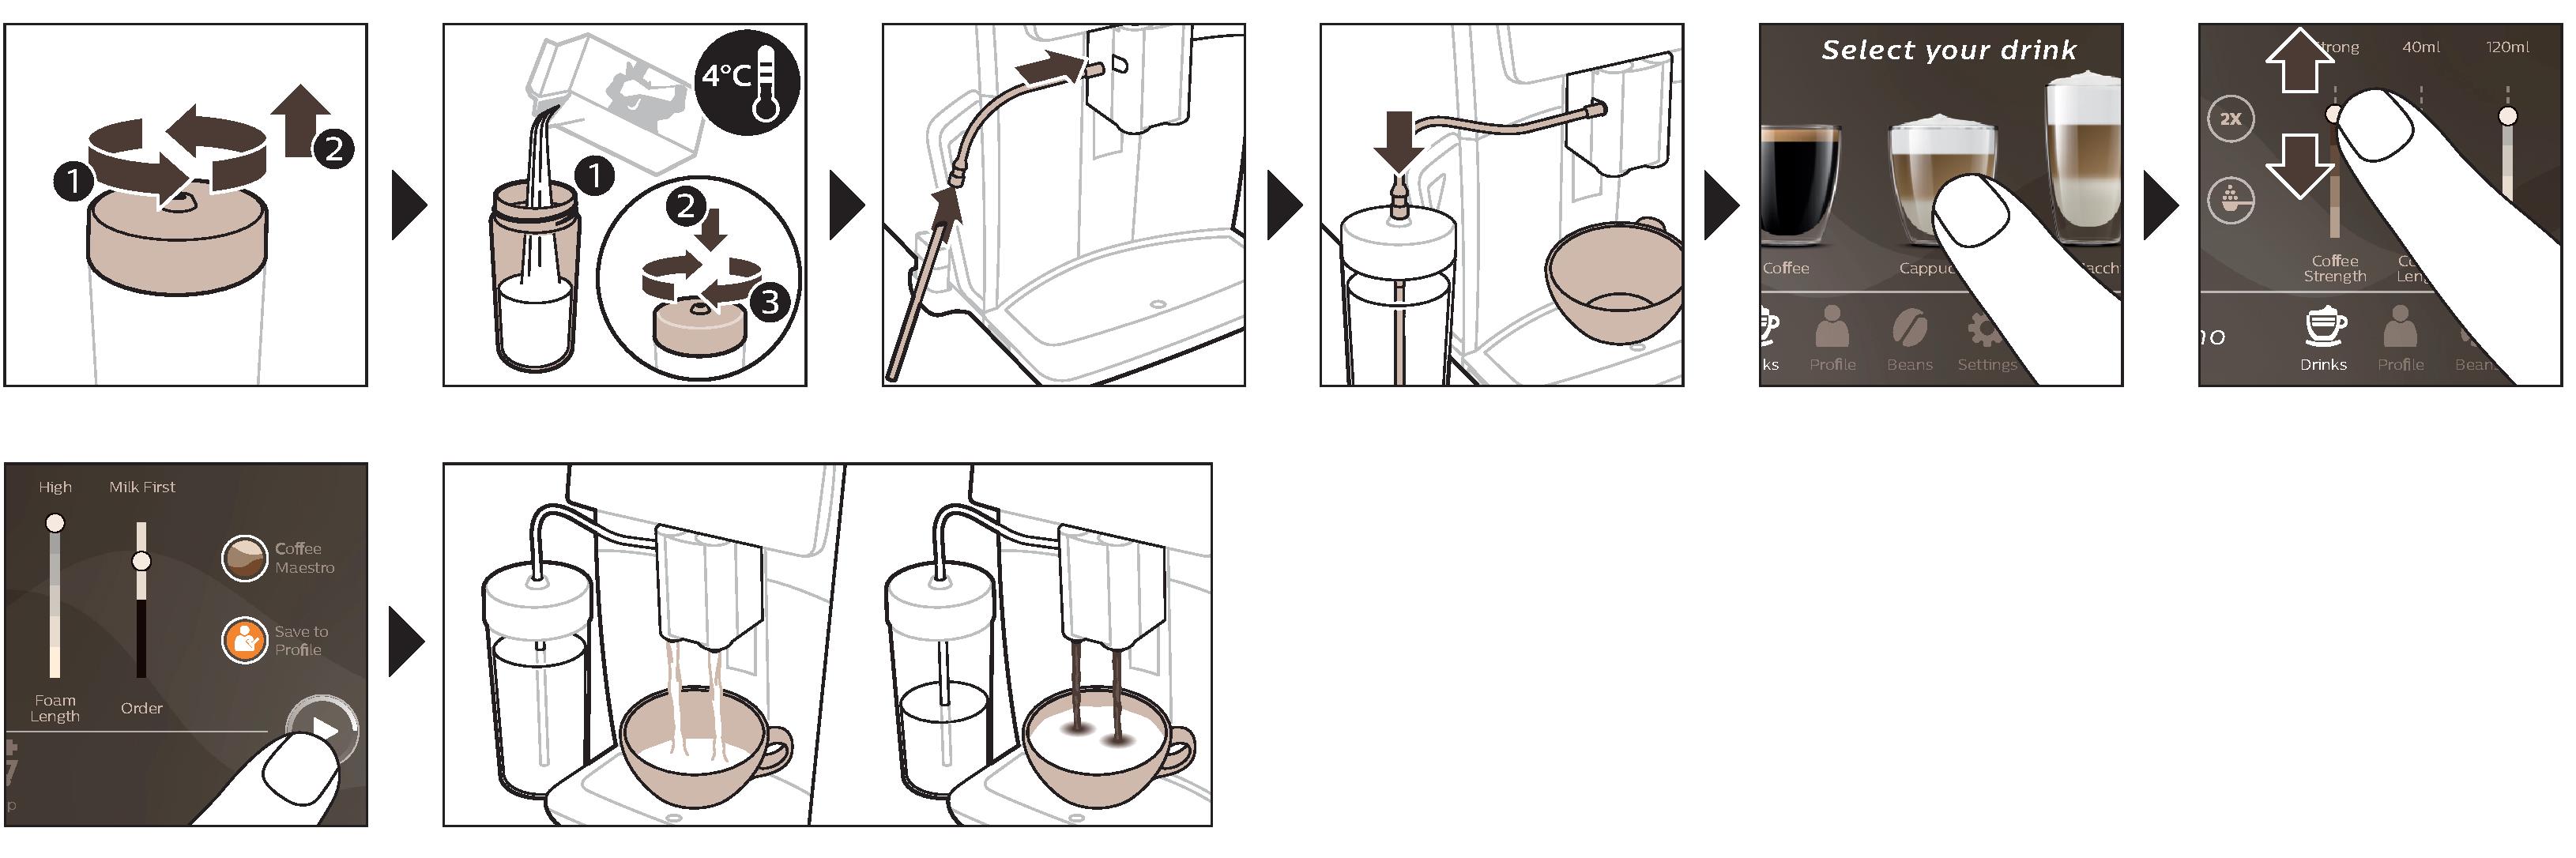
1 Fill the water tank with tap water and fill the bean hopper with beans.
Tip: When the flexible milk tube is connected to the cappuccinatore, slide the dispensing spout to the uppermost position for easy access to the water tank.
2 Unscrew the lid of the milk container and fill the milk container with milk.
Always use milk coming directly from the fridge for optimal results.
3 Connect the flexible milk tube to the cappuccinatore.
4 Place the metal milk tube in the container.
5 Tap the Drinks
icon, scroll and select the milk-based drink icon of your choice.
6 You can adjust the settings to your preference by swiping the adjustable bars up and down.
7 Press the start/stop
icon at any time to start brewing the selected drink.
- For specific drinks, the machine first dispenses milk and then coffee. For a number of other drinks this is the other way around, the machine will first dispense coffee and then milk.
- To stop dispensing milk before the machine has dispensed the preset amount, press the start/stop
icon (SM8780, SM8782, SM8785 only) or press the stop icon (SM8885, SM8889 only).
- To stop dispensing the complete drink (milk and coffee) before the machine is finished, press and hold the start/stop
icon (SM8780, SM8782, SM8785 only) or press the stop icon (SM8885, SM8889 only).
Directly after dispensing the milk, the 'HygieSteam Shot' is performed. The machine shoots steam through the internal milk system to rinse it quickly.The metal part of the milk tube may become hot. To avoid the risk of burns, let it cool down first.
Tip: You can also use a regular milk carton to brew your milk-based drinks. Place the metal milk tube directly into the milk carton.
Brewing coffee with pre-ground coffee
| To brew coffee with pre-ground coffee, you need to follow a few simple steps. |

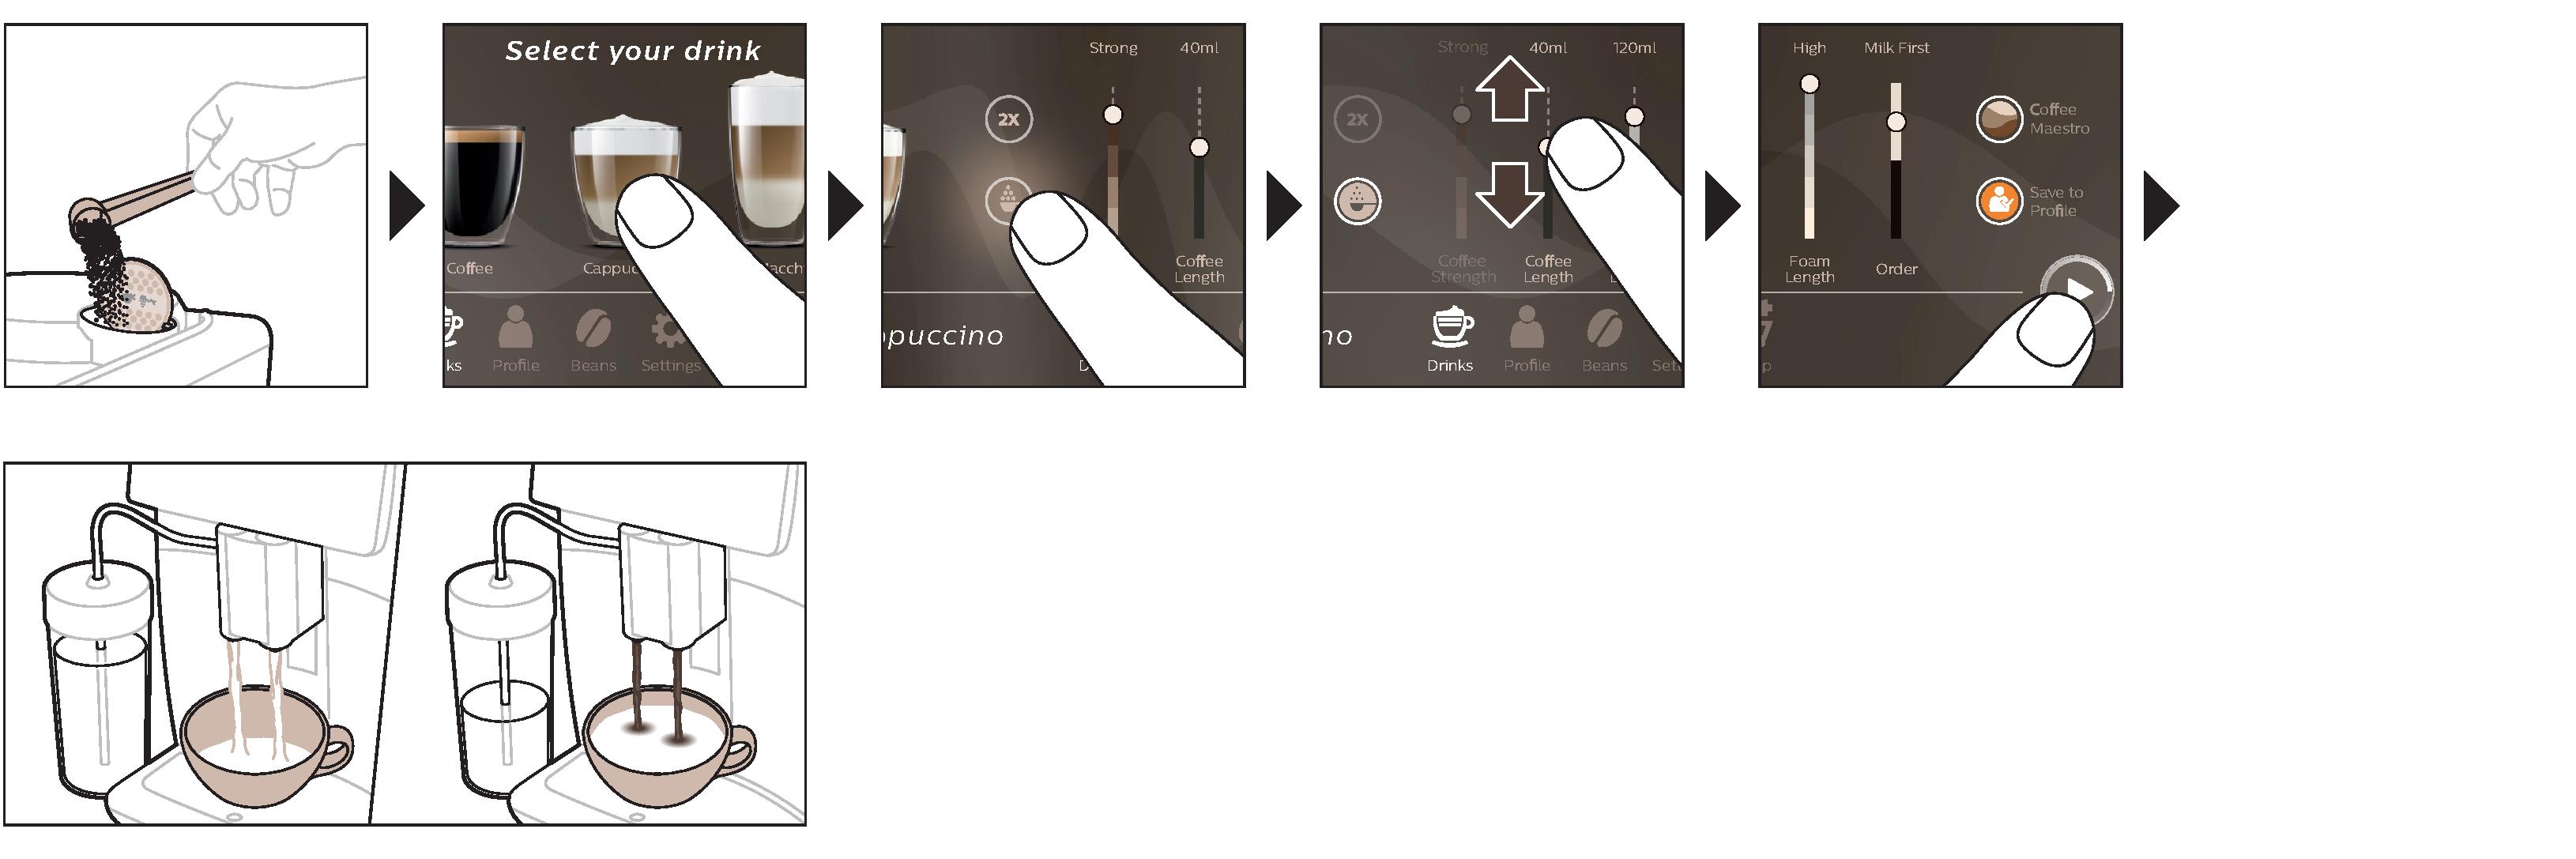
1 Open the lid of the pre-ground coffee compartment and pour one measuring spoon of pre-ground coffee into it. Then close the lid.
2 Tap the Drinks
icon, scroll from left to right and select your drink.
3 Tap the pre-ground coffee
icon.

4 You can adjust the settings to your preference by swiping the adjustable bars up and down.
5 Press the start/stop
icon to start brewing the selected drink.
If you select pre-ground coffee, you cannot adjust the coffee strength or brew more than one drink at the same time.
Dispensing hot water

1 Make sure that the internal cappuccinatore is correctly attached to the machine.
2 Place a cup under the spout.
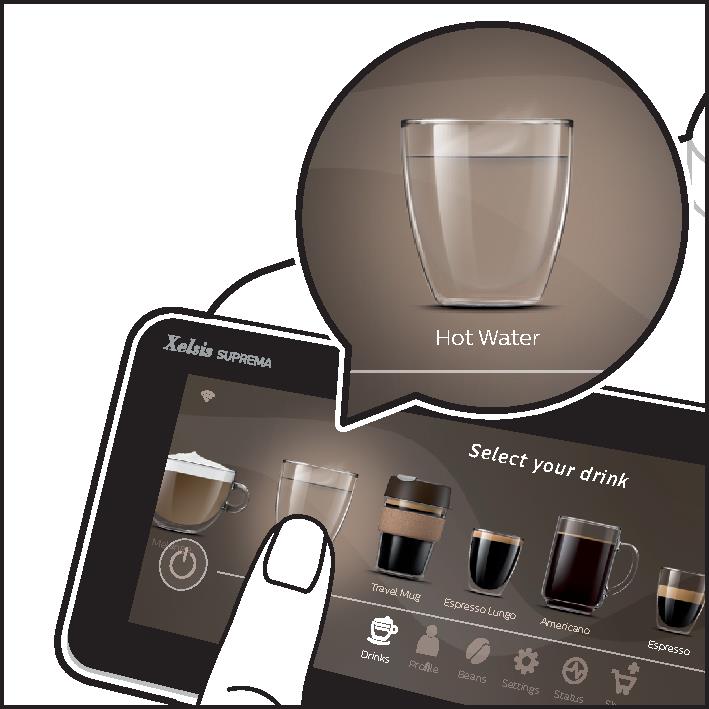
3 Tap 'Hot Water'.
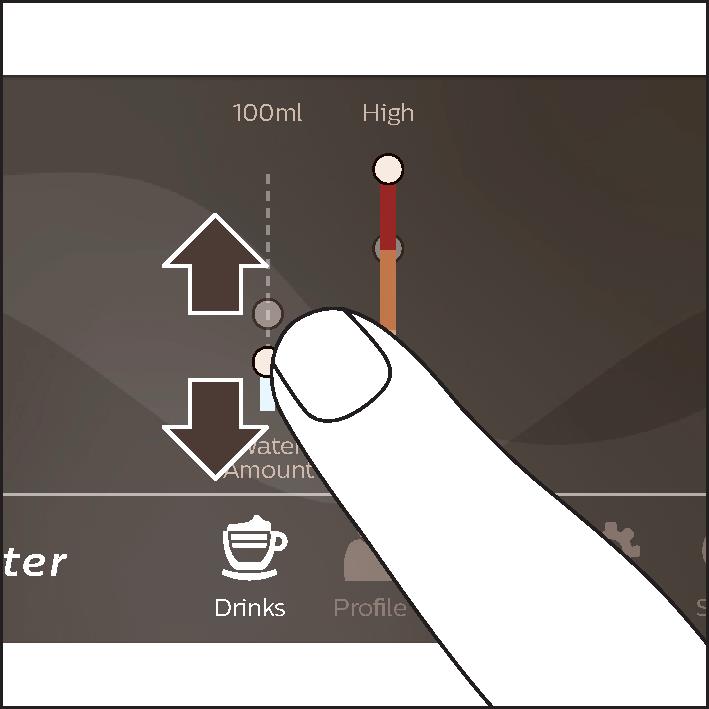
4 Slide the adjustable bars up and down to adjust the hot water quantity or temperature to your preference.
5 Press the start/stop
icon.
6 To stop dispensing hot water before the machine is finished, press the start/stop
icon again (SM8780, SM8782, SM8785 only) or press the stop icon again (SM8885, SM8889 only).
Personalization
The machine allows you to adjust the settings of a drink to your own preference and to store the adjusted drink in a personal profile. You can choose your own icon and your own profile name.
Get the best out of your beans with the BeanMaestro function
With BeanMaestro you are able to select the type and roast of your beans. It then optimizes the brewing settings automatically, to get the best out of your coffee beans.
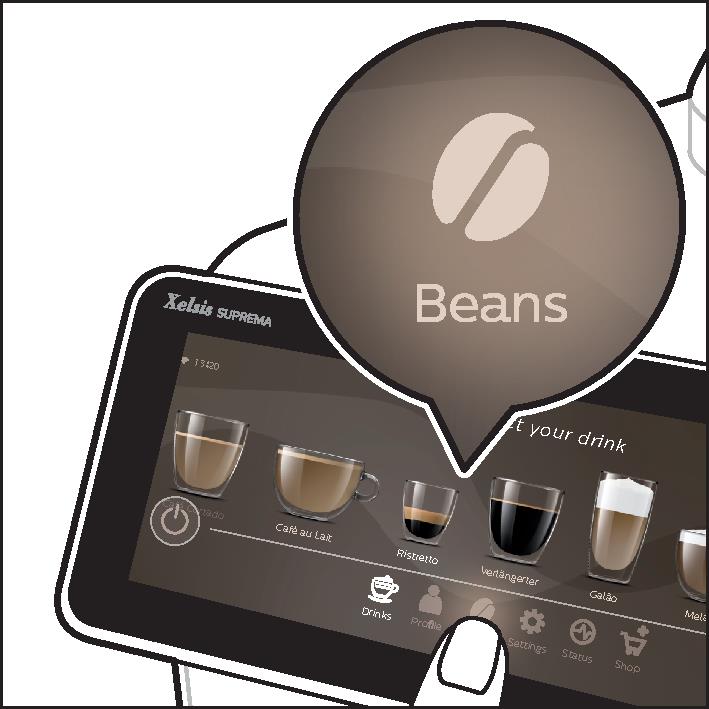
1 Tap on the Beans icon in the main menu.
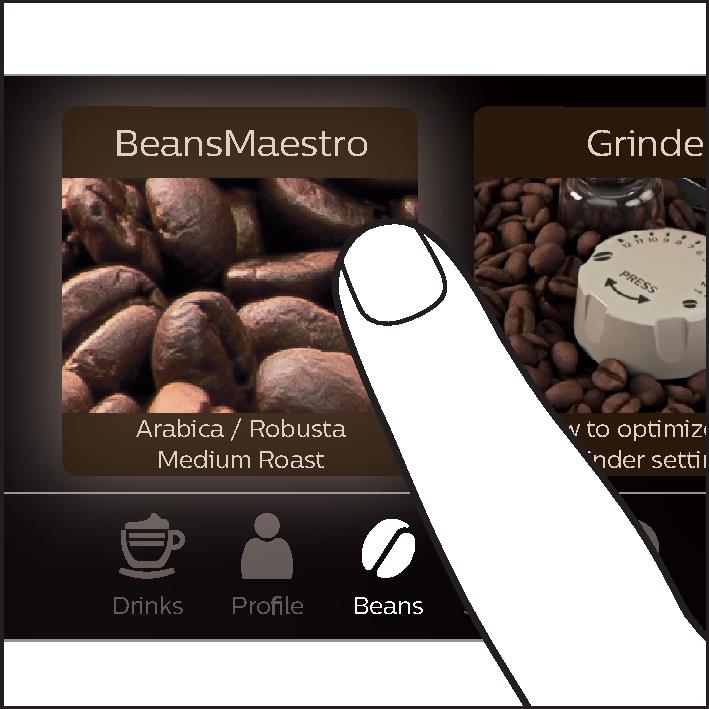
2 Tap the BeanMaestro function.
3 Select the type of beans. You can choose between Arabica and Robusta blend.
4 Select the roasting level of your beans.
5 The brewing settings are optimized automatically.
6 Enjoy your next coffee.
Speed up with CoffeeMaestro
Your machine offers the possibility to select taste profiles instead of adjusting all settings separately with the CoffeeMaestro function. You can choose between Delicato, Intenso and Forte. To select a CoffeeMaestro taste profile:
1 Tap the drink icon of your choice.

2 Tap the CoffeeMaestro icon repeatedly.
- The main settings of the drink are now adjusted accordingly.
3 Press the start/stop
icon to start brewing the drink.
Personalize your drink with the CoffeeEqualizer Touch+ function
After selecting a drink, the CoffeeEqualizer Touch+ function is activated automatically, allowing you to adjust the drink settings. Long press on each of the items on the display to activate the help function and receive further information.
With the CoffeeEqualizer Touch+ function you can adjust the following settings:
1 Aroma strength
2 Coffee quantity
3 Milk quantity
4 Water quantity
5 Drink temperature
6 Foam amount
7 Coffee flavor
8 You can also decide to prepare 1 or 2 cups
9 The order of first dispensing coffee or milk
Note: It depends on the drink you choose which settings you can adjust.
Save your favorite drinks in a profile
The machine allows you to adjust the settings of a drink to your own preference and to store the adjusted drink in a personal profile. You can select a profile and store a recipe using the profiles.
You can create a profile and add a drink using the profile
icon.

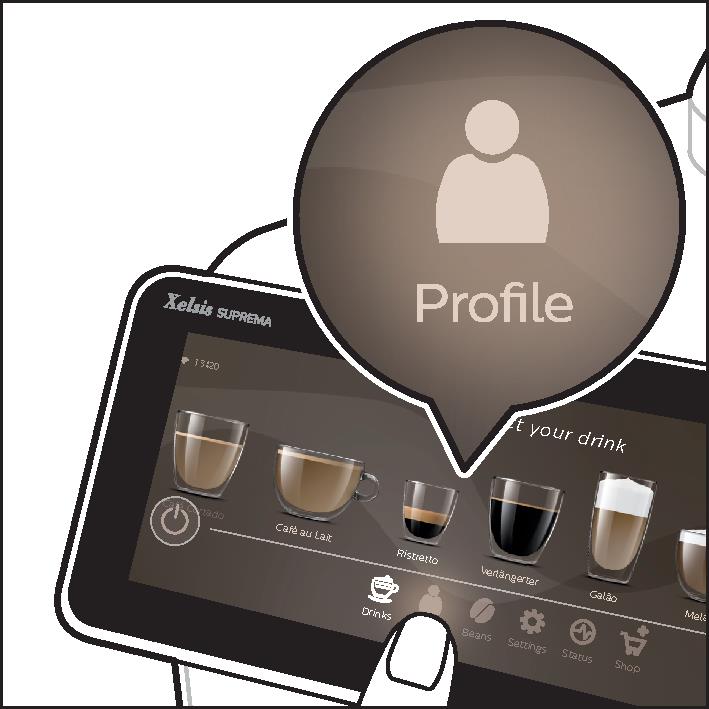
1 Tap the profile
icon on the main menu.
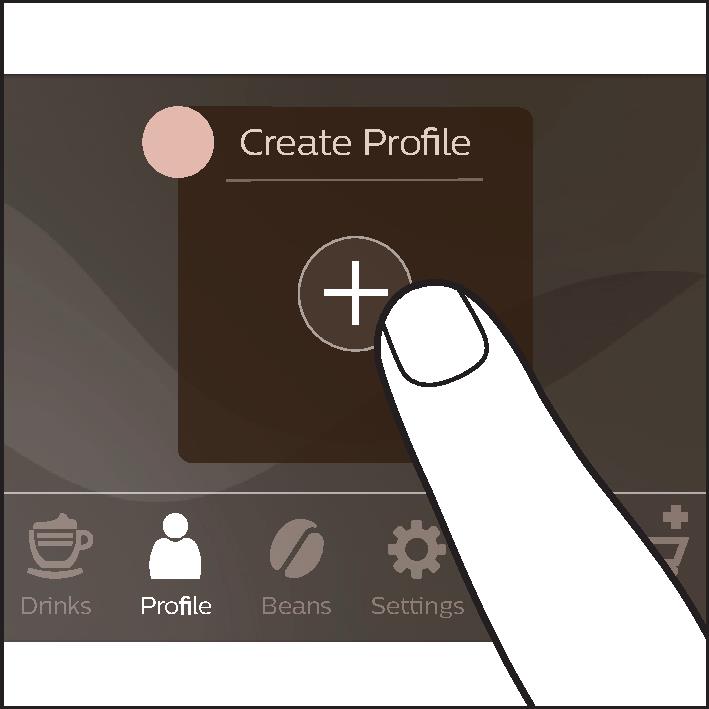
2 Tap the Plus icon.
3 Type your name and select your favorite icon.
4 You are ready to add a drink. Tap the drink icon of your choice.
5 Personalize the drink via the CoffeeEqualizer Touch+ or the CoffeeMaestro function.

6 Tap on the 'Safe to profile' icon to store it in your personal profile.
Extra shot (ExtraShot)
Your machine offers you the possibility to add an extra shot of Ristretto to your coffee and milk drinks, for example if you want to have a stronger coffee.
1 Place a cup under the spout.
2 Tap one of the one-touch drinks icons to select a drink.
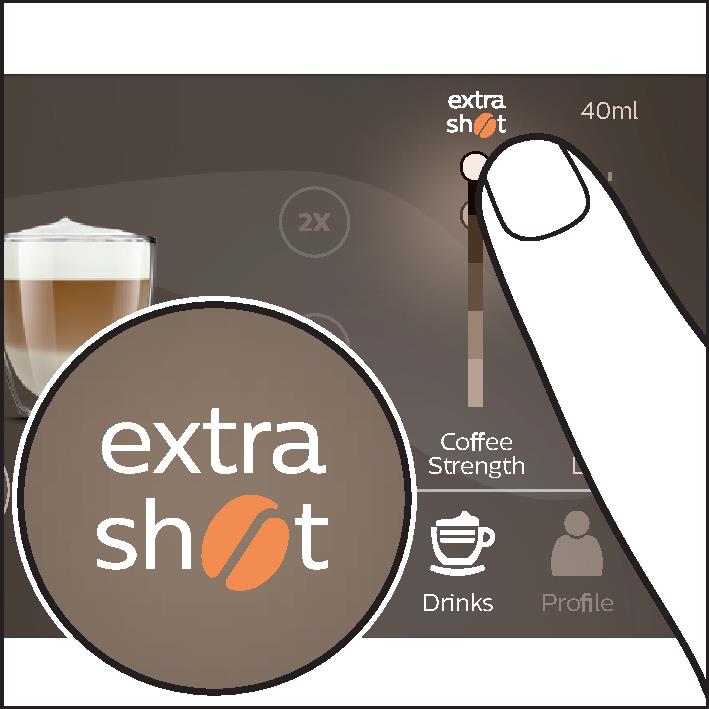
3 Slide the adjustable bar up to set the strength to the top level and select the ExtraShot function.
4 Then press the start/stop
icon (SM8780, SM8782, SM8785 only) or press the start icon (SM8885, SM8889 only) to start brewing the drink.
5 To stop dispensing the drink before the machine has finished, press the start/stop
icon again (SM8780, SM8782, SM8785 only) or press the stop icon again (SM8885, SM8889 only).
When you have selected the ExtraShot function, you can only brew one coffee at a time.
The extra shot function is not available for all drinks.